Worktrees & Workspaces
Workspaces in Reliant allow you to work on multiple branches of your project simultaneously without switching contexts. This feature is built on top of Git worktrees, providing isolated working directories for each branch while sharing the same repository.
Note
In Reliant, we call these Workspaces. Under the hood, they are standard Git worktrees.
Manage multiple workspaces in parallel
What are Workspaces?
A Workspace corresponds to a Git worktree—a separate working directory for a specific branch, linked to the same underlying repository. This means you can have multiple checkouts of your project active at once, each with its own files, build artifacts, and installed dependencies.
With workspaces, you can work on a feature branch while running tests on another, compare implementations side-by-side, or maintain different dependency versions. Since each workspace is a full working directory, there’s no need to stash changes or commit work-in-progress just to switch contexts.
In Reliant, workspaces become even more powerful because they integrate directly with the AI assistant. When you switch workspaces, the AI’s context switches too, giving you isolated development environments that include both your code and your AI conversations.
Creating Workspaces
From the Workspace Panel
Create a new workspace with custom settings
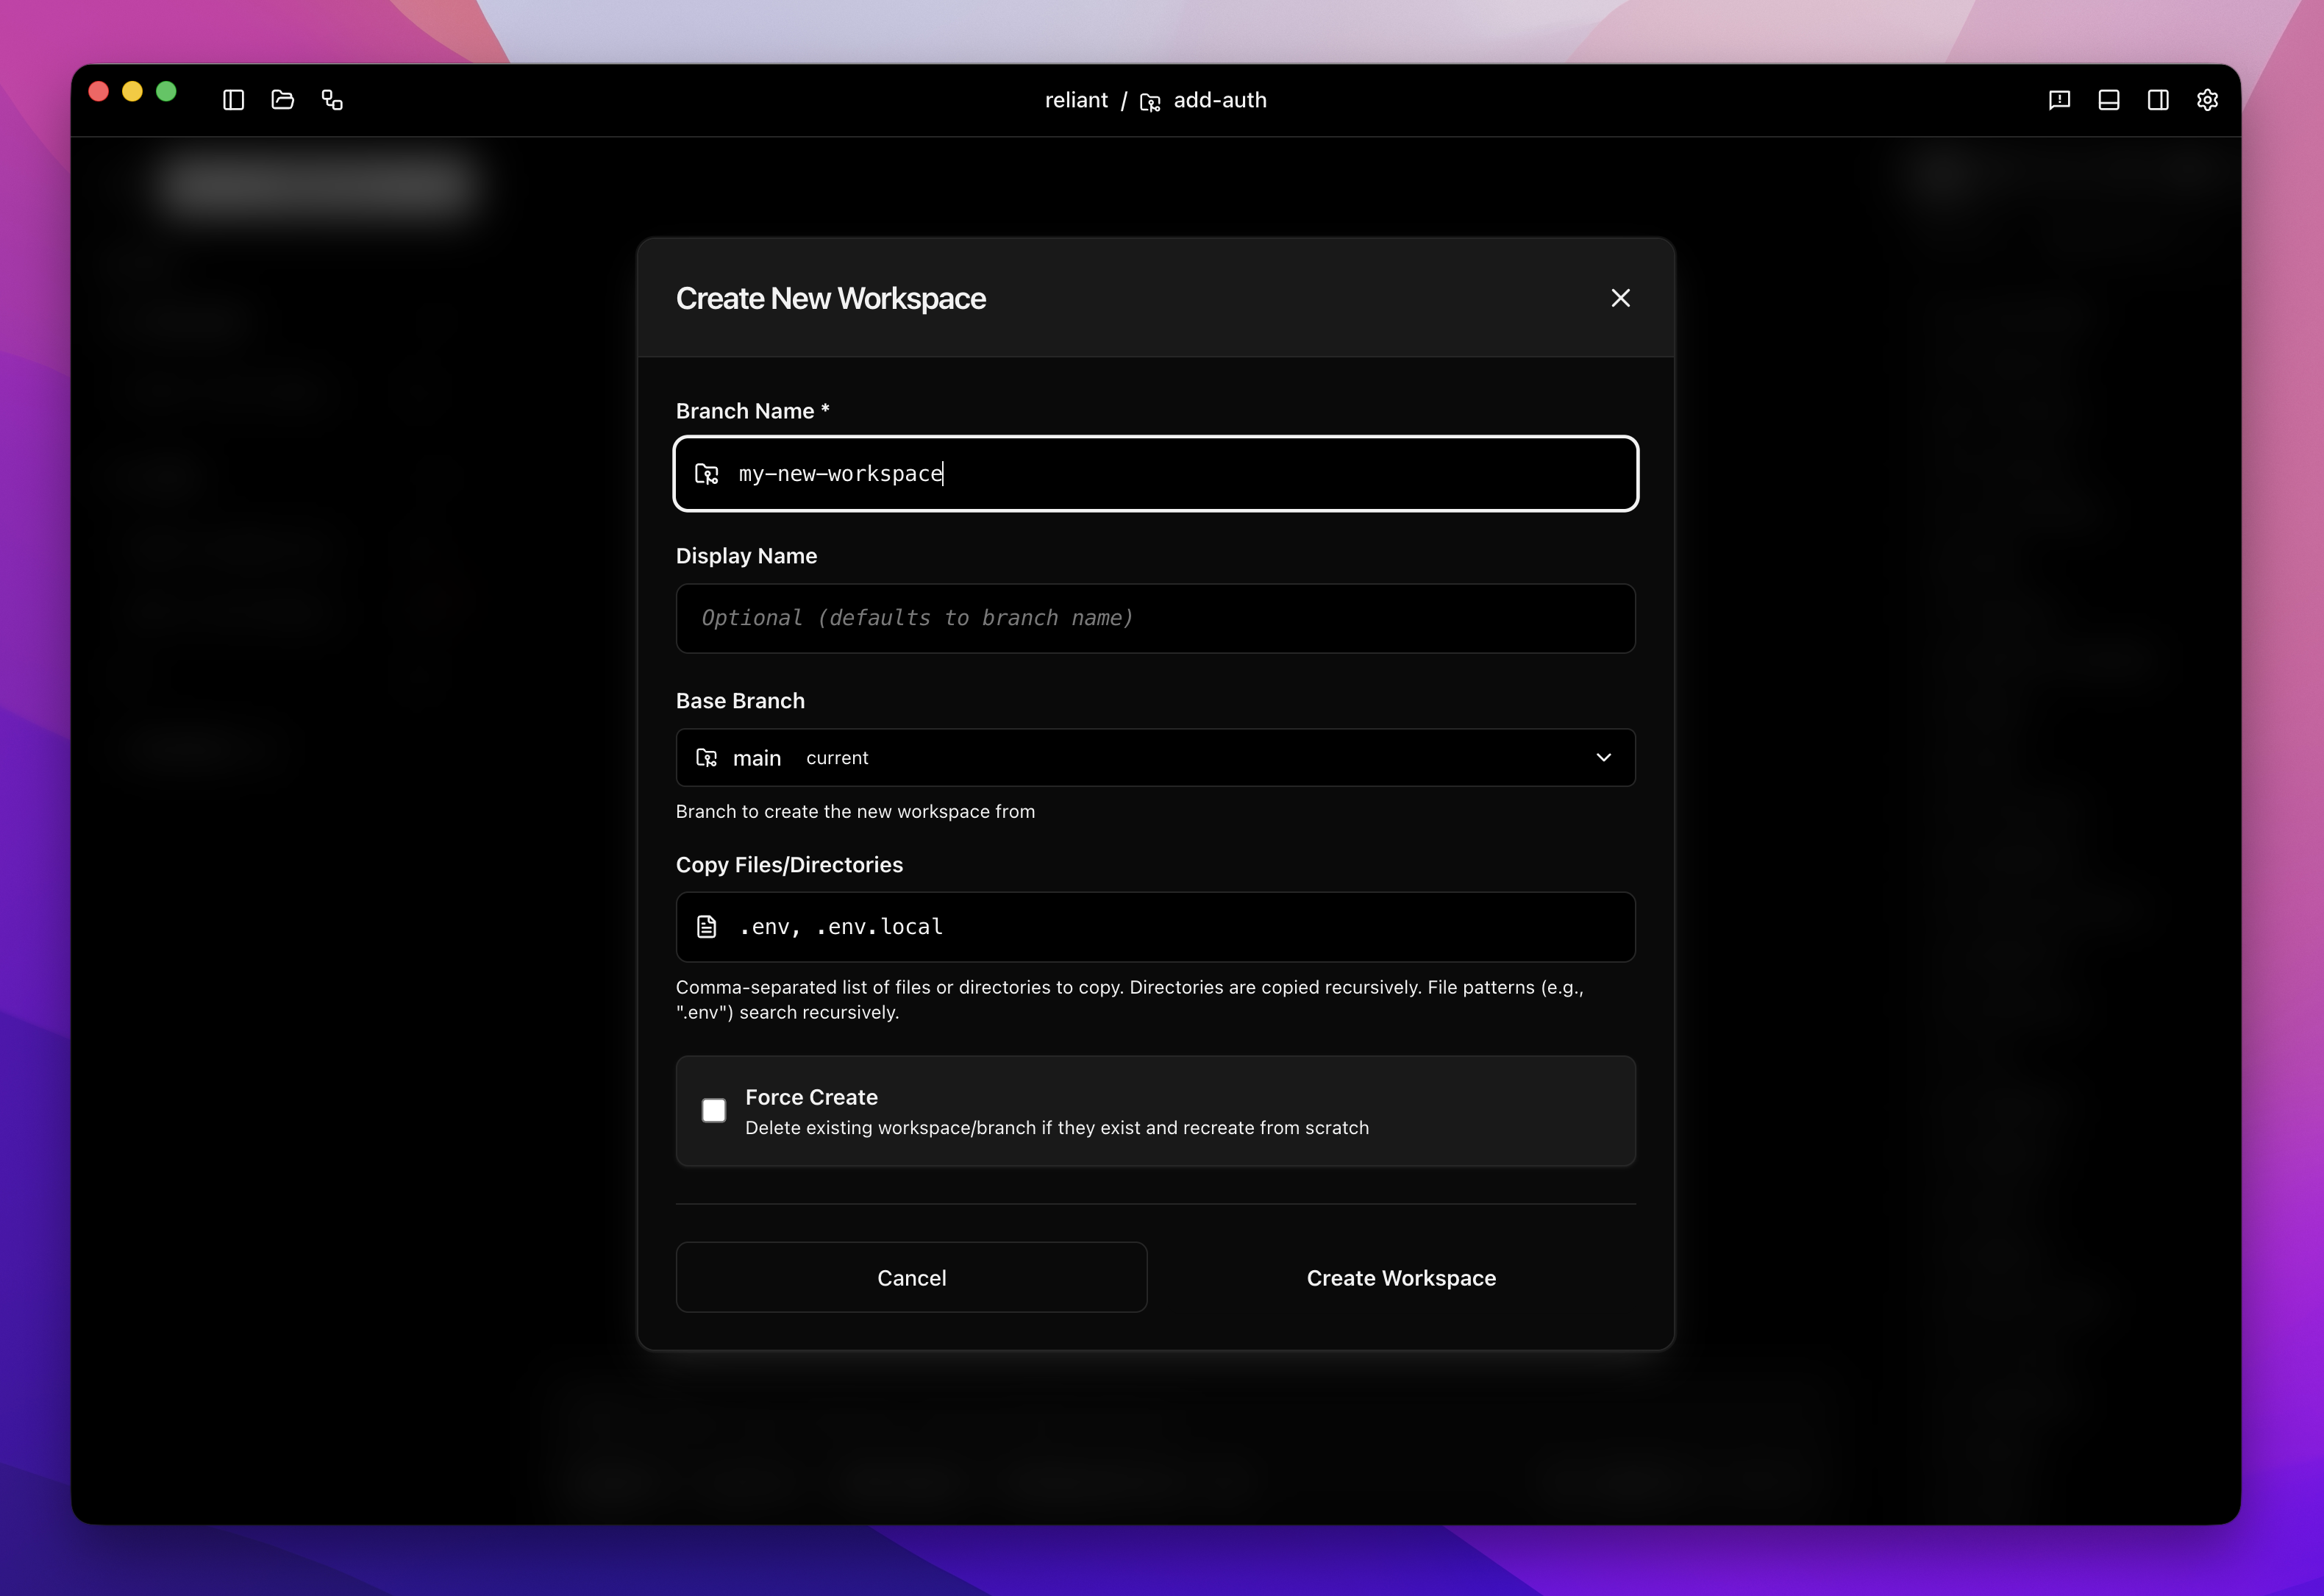
To create a workspace manually, navigate to the Workspaces tab in the left navigation and click Create Workspace. You’ll need to provide a branch name for the new workspace, and optionally a display name if you want something more descriptive. Choose which base branch to create from (defaults to “main”), and specify a custom working directory if needed.
Once created, the workspace becomes immediately available and is automatically selected as your current context. Reliant creates the underlying Git worktree, sets up the directory structure, and prepares the environment for development.
Workspaces in Workflows
Workspaces integrate deeply with Reliant’s workflow system through the CreateWorktree activity. This enables automated workspace creation as part of larger development workflows.
The CreateWorktree Activity
When building workflows in the Workflow Editor, you can use the CreateWorktree activity to programmatically create workspaces. This activity accepts a name for the workspace, an optional base branch to branch from, and a list of files to copy from the source repository.
The activity automatically handles branch creation, directory setup, and file copying. After execution, it stores workspace information (path, branch name, and other metadata) in the workflow context.
Parallel Implementation Patterns
One compelling use case is the parallel-compete workflow pattern, where multiple AI agents work on the same task independently in separate workspaces. Each agent gets its own isolated environment, implements their solution, and the workflow can then compare results.
For example, a parallel-compete workflow might:
- Create two workspaces from the same base branch
- Spawn separate agent sessions in each workspace
- Give both agents the same implementation task
- Wait for both to complete
- Present both solutions for comparison
This pattern works because workspaces provide true isolation. Each agent has its own files, can install dependencies, run builds, and make commits without affecting the other.
Copying Configuration Files
Many projects have local configuration files that shouldn’t be committed but are needed for development—files like .env, .env.local, or local database configurations. The CreateWorktree activity supports a copy_files parameter that handles this automatically.
When you specify files to copy, Reliant searches recursively through the source repository and copies matching files to the new workspace, preserving their directory structure. If your project has frontend/.env and backend/.env, both get copied to the corresponding locations in the new workspace.
Workspace Lifecycle in Workflows
Workspaces created by workflows follow a managed lifecycle. The workflow system tracks which workspaces it creates, and you can configure cleanup behavior. Some workflows might delete workspaces after merging successful implementations, while others keep them for review.
In the Workspaces panel, workflow-created workspaces appear alongside manually created ones. You can manage them the same way—switch to them, view their status, or delete them when no longer needed.
Integration with Chat
Workspaces and chat sessions are tightly integrated in Reliant. The workspace you have selected determines the context for your AI conversations.
Context Switching
When you switch workspaces, the AI assistant’s context switches with you. The assistant sees the files, Git history, and project state of the selected workspace. If you ask about recent changes or want to modify code, the assistant works with the workspace you have selected.
This means you can have different conversations happening in different workspaces. Switch to your feature branch workspace to work on new functionality, then switch to your bugfix workspace to address an issue—each conversation picks up where you left off in that context.
Tool Paths and Operations
All file operations from the AI assistant use paths relative to the current workspace. When the assistant reads files, makes edits, or runs commands, those operations happen in the selected workspace’s directory. This ensures changes go to the right place and prevents accidentally modifying the wrong branch.
The same applies to Git operations. Commits, pushes, and status checks all reflect the selected workspace’s state.
Starting Fresh Conversations
Sometimes you want a completely fresh start in a workspace. You can create a new chat session while keeping the same workspace selected, giving you a clean conversation history while maintaining the same code context.
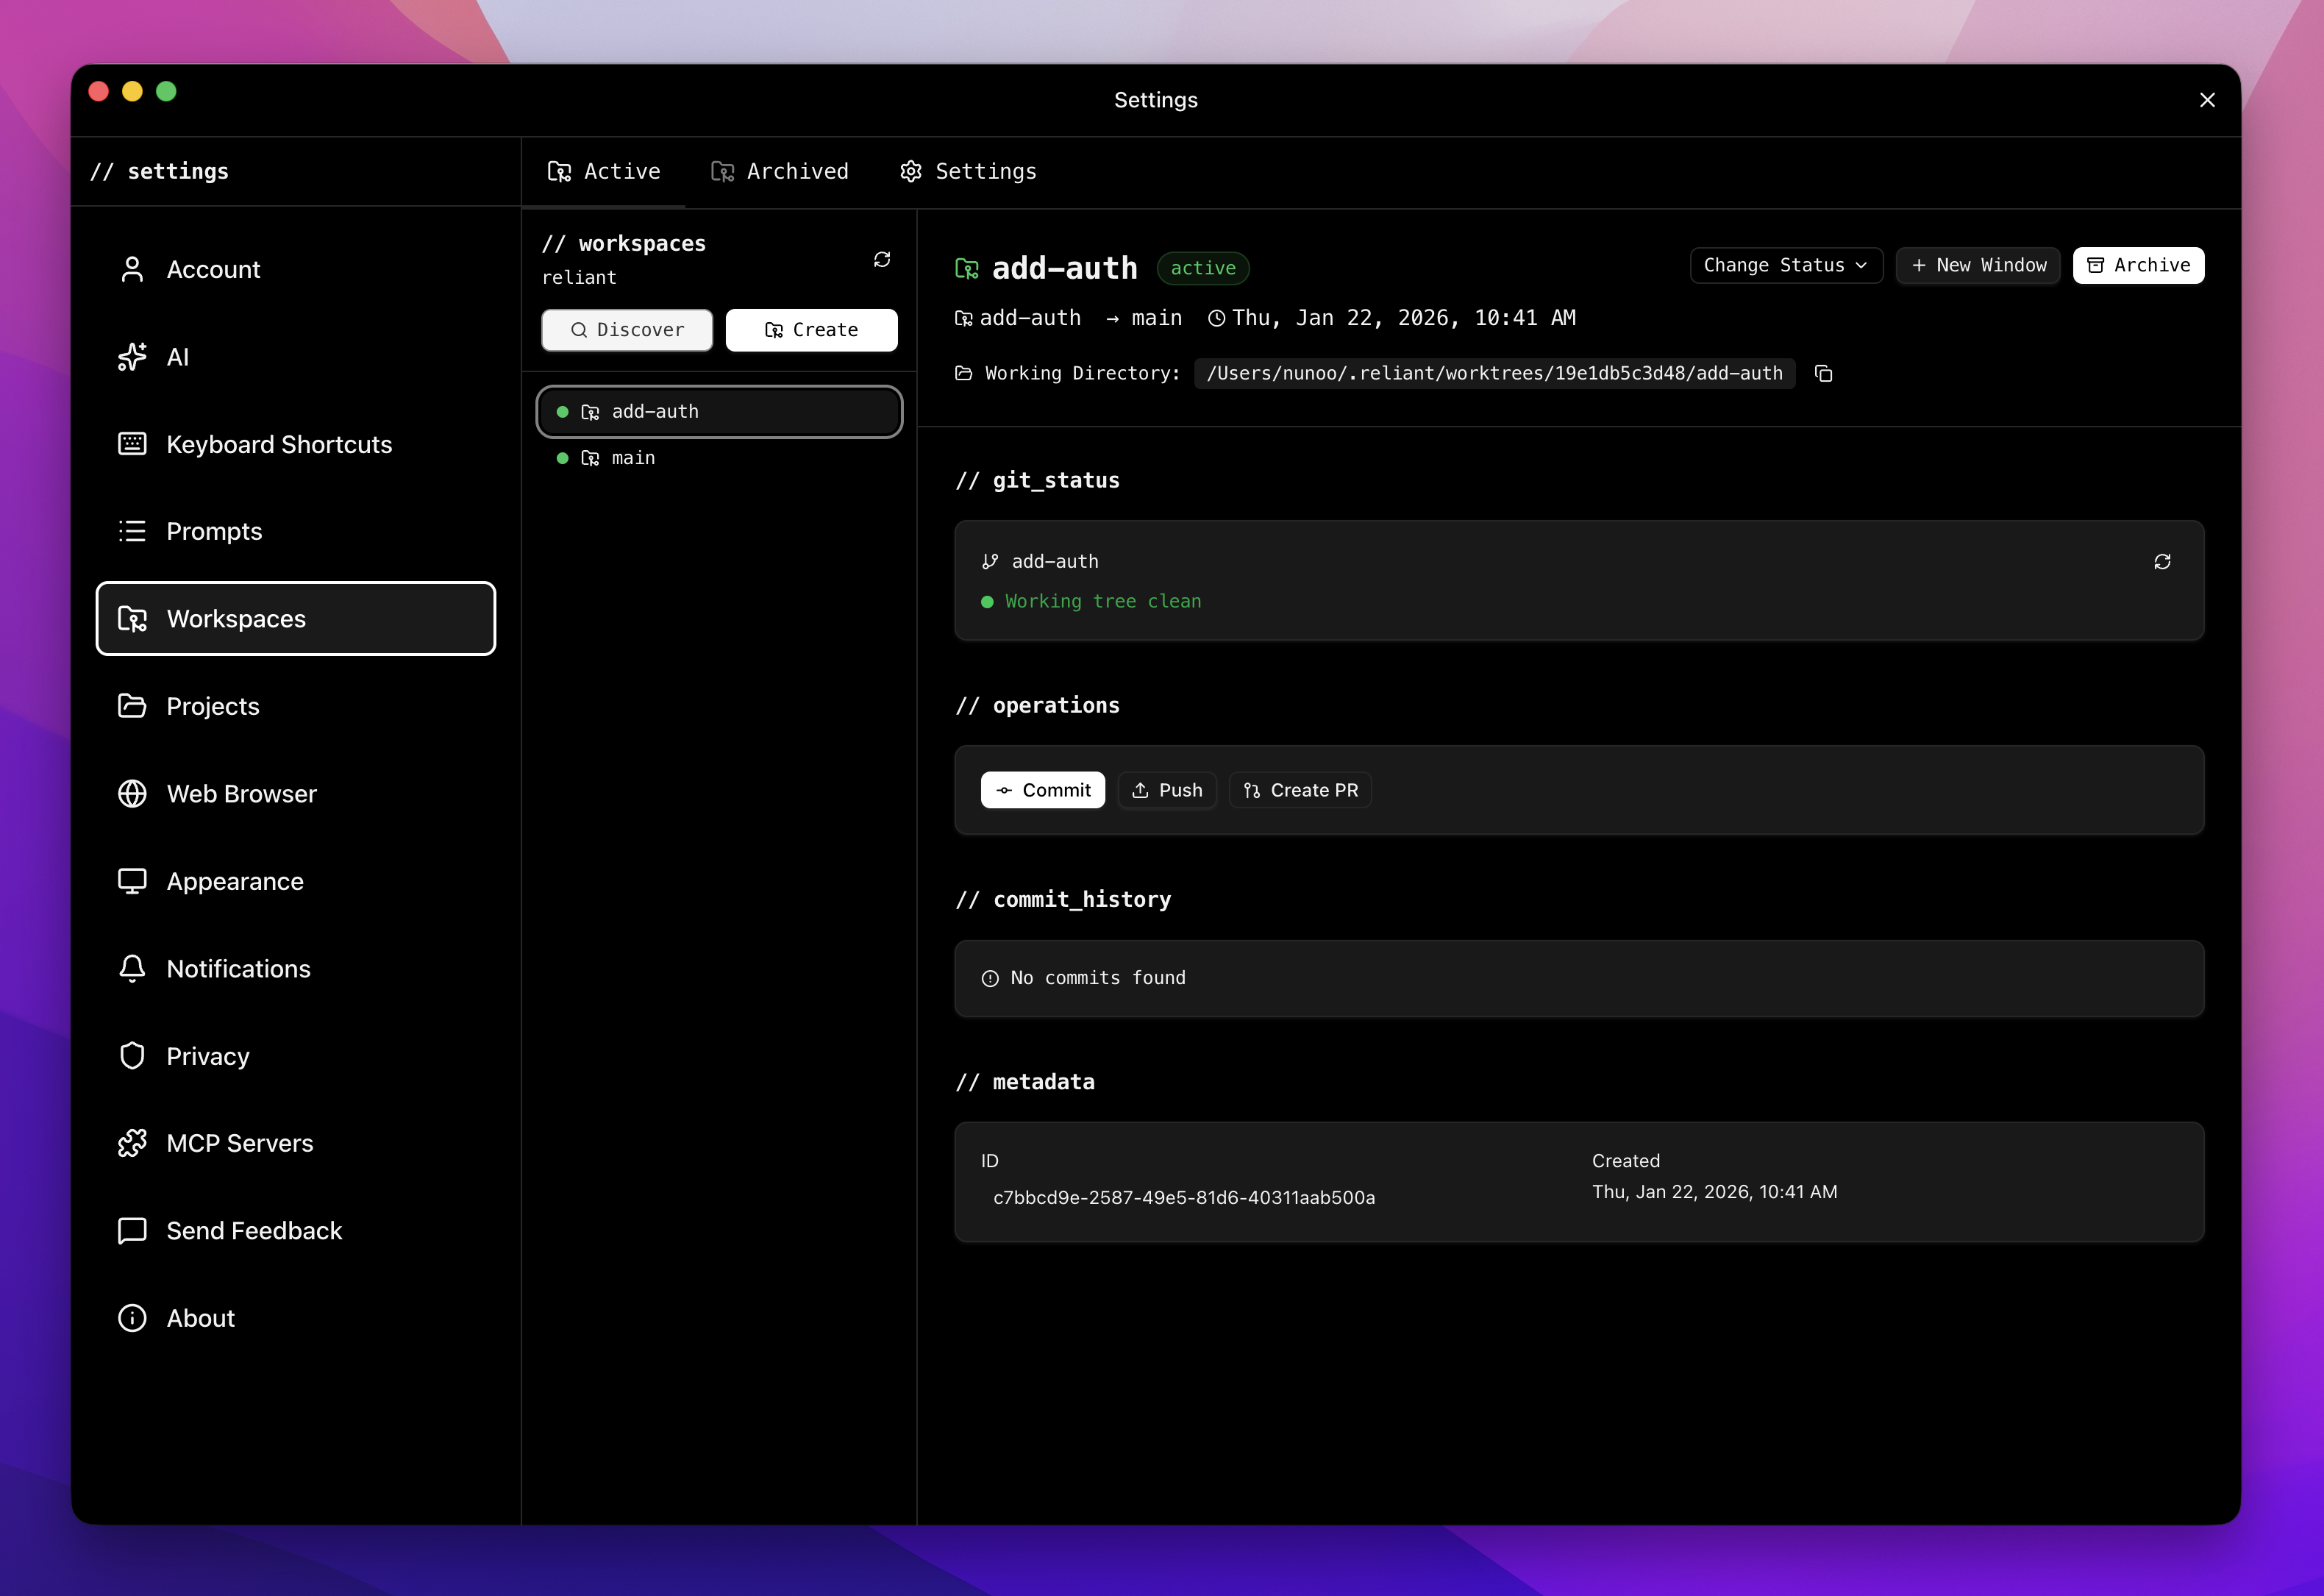
Managing Workspaces
Workspace List
The Workspaces panel displays all your workspaces with their name, associated Git branch, base branch, and current status. Click any workspace to select it and see its details.
Status Types
Workspaces have status indicators that help you track progress:
Active indicates work is ongoing. Completed means the work is finished and ready for merge. Abandoned marks workspaces that are no longer needed. Merging shows workspaces in the process of being merged to their base branch.
Detail View
Selecting a workspace reveals detailed information including the full working directory path (with a copy button for easy access), current Git status showing modified, staged, and untracked files, and sync status indicating commits ahead or behind the remote.
Actions
Each workspace supports several actions. New Window opens the workspace in a separate Reliant window, letting you work on multiple workspaces simultaneously with their own chat sessions. Delete Workspace removes the workspace when you’re done with it, cleaning up the directory and branch reference.
Git Operations
The workspace detail view provides direct access to common Git operations.
Commit opens a dialog where you can write a commit message and commit staged changes. Push sends your commits to the remote repository and updates the ahead/behind status. Create PR opens a dialog for creating a pull request, letting you write a title and description before submitting to your Git platform.
The Git status display updates in real-time as you work, showing exactly what files have changed and their staging state.
Best Practices
Naming and Organization
Use descriptive branch names that follow your team’s conventions—patterns like feature/user-authentication or bugfix/login-redirect make it clear what each workspace contains. Keep workspace display names concise but meaningful.
Update workspace status as work progresses. Marking a workspace as completed signals it’s ready for review, while abandoned status helps identify cleanup candidates. Regular cleanup of old workspaces keeps your environment organized and frees disk space.
Effective Parallel Development
Keep a clean main branch workspace available for reference and comparison. Create one workspace per feature or bug fix to maintain clear separation. When you need to switch contexts quickly, workspaces eliminate the need for stashing—just click and you’re there.
For projects with complex dependencies, each workspace can maintain its own installed packages. This is particularly valuable when testing upgrades or when different features require different dependency versions.
Workflow Integration
When designing workflows that create workspaces, always specify the files that need copying for a functional development environment. Consider the cleanup strategy—will workspaces be deleted automatically, or should they persist for review?
For parallel implementation patterns, give each workspace a descriptive name that indicates its purpose or the approach being tried. This makes comparison easier when reviewing results.